
 By Rbia Eman
Your wedding bouquet is one of the most photographed details of your big day and making it yourself can save money, reduce stress, and add a deeply personal touch to your celebration.
If you’ve been searching for how to make a wedding bouquet that looks professional without hiring a florist, this guide walks you through every step, from selecting flowers to wrapping the perfect handle.
Whether you’re working with fresh blooms or long-lasting artificial flowers, the techniques below will help you build a bouquet that’s full, balanced, and camera-ready.
Why Make Your Own Wedding Bouquet?
Before diving into the steps, it helps to know why so many brides are choosing the DIY route:
- Cost savings Florist-made bouquets can be one of the priciest line items in a wedding budget. Making your own cuts that cost significantly.
- Full creative control You choose every stem, color, and texture, so the final result matches your vision exactly.
- Flexibility with timing If you use silk or real-touch artificial flowers, you can assemble your bouquet weeks in advance instead of rushing the morning of the wedding.
- A meaningful keepsake A handmade bouquet becomes something you can display at home long after the wedding is over.
What You’ll Need
Gather these supplies before you start:
- Your chosen flowers (fresh or artificial) plus greenery/filler
- Floral wire and floral tape
- Wire cutters or sharp scissors
- Ribbon (satin or lace works beautifully)
- Pins or hot glue
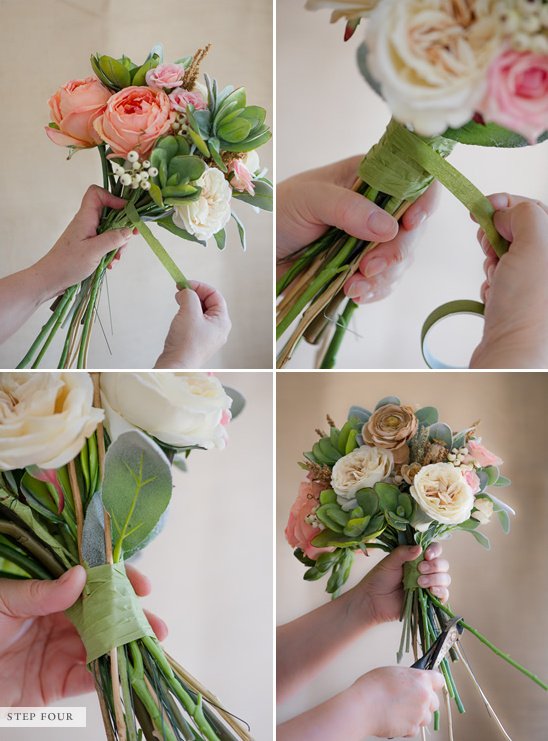
Step by Step: How to Make a Wedding Bouquet
Step 1: Choose Your Flowers and Color Palette
Start by picking two to three main flower varieties that reflect your wedding theme. Popular choices include roses, peonies, ranunculus, and eucalyptus. Add filler flowers like baby’s breath, wax flower, or small greenery to give the bouquet volume and texture. Stick to a cohesive color palette two or three main shades with a couple of accent tones usually looks the most elegant.
Step 2: Prep and Trim the Stems
Trim all stems to roughly the same length, around 8–10 inches, using sharp wire cutters or floral scissors. Strip away any extra leaves or bulky plastic near the base so the stems are easier to bundle later.
Step 3: Arrange the Flowers Using the Spiral Technique
This is where your bouquet really starts to come together. Hold your largest, most prominent bloom in the center, then add each additional stem at a slight angle around it, rotating as you go.
This spiral method creates a naturally rounded, full shape rather than a stiff, flat one. Distribute colors and flower sizes evenly so no single side looks heavier than the other.
Step 4: Secure the Stems
Once you’re happy with the arrangement, wrap floral wire tightly around the stem bundle to lock everything in place. Follow this with a layer of floral tape, which grips the wire and creates a smooth base for the ribbon.
Step 5: Wrap the Handle
Wrap satin or lace ribbon around the stems, working from the top down and overlapping each layer slightly for a clean, polished look. Secure the end with a few dabs of hot glue or a small pin.
This is a great moment to add a sentimental touch, like a brooch from a family member or a small charm.
Step 6: Make Final Adjustments
Step back and fluff the flowers, gently bending a few stems for a softer, more natural silhouette. Fill in any visible gaps with extra greenery or small filler blooms until the bouquet looks full and balanced from every angle.
And that’s it you now have a handcrafted wedding bouquet ready for your ceremony, photos, and years of memories afterward.
Common Mistakes to Avoid
Even simple DIY projects can go wrong in small ways. Watch out for these common pitfalls:
- Choosing low-quality flowers cheap plastic blooms can look flat in photos. Opt for silk or real-touch varieties for a natural finish.
- Using only one flower type A single variety often looks plain. Mix textures and sizes the way a professional florist would.
- Skipping greenery Foliage adds realism and depth; don’t leave it out.
- Not securing stems properly Skipping the wire and tape step can leave your bouquet loose and wobbly.
- Arranging stems straight instead of spiraled This creates a stiff look instead of a soft, rounded one.
- Clashing colors Too many competing shades can make the bouquet look chaotic. Stick to a simple, cohesive palette.
- Leaving the handle unfinished The handle is often photographed up close, so wrap it neatly and avoid exposed tape.
- Waiting until the last minute gives yourself time to arrange, adjust, and fix any imperfections before the big day.
- Overcrowding the bouquet More isn’t always better; focus on balance rather than cramming in extra stems.
- Skipping a practice run If this is your first time, practice with spare flowers before assembling the final version.

Final Thoughts
Learning how to make a wedding bouquet yourself is a rewarding project that combines creativity with practicality. With the right materials, a bit of patience, and the techniques above, you can craft a bouquet that looks every bit as stunning as one from a professional florist and carries the added meaning of being made with your own hands.
Take your time, practice the spiral technique, and don’t be afraid to make adjustments until it feels just right. The result will be a bouquet that not only photographs beautifully but becomes a lasting keepsake from your wedding day.
Frequently Asked Questions
How do I make my bouquet look realistic if I’m using artificial flowers? Choose high-quality silk or real-touch flowers, mix in greenery, and gently bend the stems to mimic the natural curves of fresh blooms.
How big should a wedding bouquet be?
Bridal bouquets typically range from 10–12 inches wide, while bridesmaid bouquets are usually a bit smaller, around 6–9 inches.
Do I need to wrap the handle?
Yes, wrapping the handle with ribbon or lace hides the wire and wraps the bouquet in a clean, finished look. It’s also a great spot to add a personal charm or brooch.
Can I use the same flowers for bridesmaids and décor?
Absolutely. Many couples use the same artificial or fresh flowers across bridesmaid bouquets, centerpieces, boutonnieres, and arches for a cohesive, budget-friendly look throughout the venue.
Where can I buy flowers for a DIY bouquet?
Craft stores, online marketplaces, and specialty florists all carry bouquet-ready flowers in a range of qualities and price points, so it’s worth comparing a few options before you buy.